

Correct ground preparation is the most important part of any driveway installation or paving and patio project. Without the proper preparation and materials it will simply sink. This is because the top layer of block/slab/tarmac will not be properly supported underneath.
Too often, companies offer very cheap block-paving installations, but leave out the sub-base so they can make more profit. It may look good when it is finished, but within a few weeks or months it will sink.
We are meticulous in our ground preparation because we have a reputation to uphold and want you to be satisfied with our work for many years. We pride ourselves on our reputation, and as a local company its not in our interest to carry out sub-standard work.
We would normally spend over half of the installation time preparing the ground, digging the foundation, laying the sub grade and sub base, installing drainage if needed, installing any necessary kerbs and walls, and leveling the bedding layer before finally laying the blocks or slabs. A typical block paving installation is explained below.

Construction of a Block Paving Driveway or Path
Sub-Grade
Block paving baseWe dig the surface area out to a depth of approx 200mm. This allows for the depth of the paving blocks + 50mm bedding + 100mm sub-base.
All weeds and other unwanted material is removed, and we excavate any soft spots and fill with compacted sub-base material. If you wish we can then install a high quality landscape fabric to ensure you don’t have any nasty weeds or roots appearing in the future.
Sub-Base
This is essential to ensure your paving lasts a long time. The sub-base layer is often the main load-bearing layer of a paved area. It is designed to evenly spread the load of the paving, and any traffic. We use high quality sub-base material, using a compacter to firmly compress is. This can take time and we may need to go over it many times to ensure it’s properly compacted.

Edge Course
Blopck paving edgingOnce we have completed the sub-base, we will install the edging courses and drainage. The perimeter edges of the paving can be laid in a different colour, or even a different block, and is laid on a concrete bed, against an exisiting or new wall or paving edgers. This will prevent sideways movement and are strong enough to withstand the forces of your vehicles.
Bedding Layer
We lay the paving blocks directly onto a bed of coarse grit sand (screed), approximately 35-50mm thick. WE DO NOT USE BUILDING SAND – it is too soft and can become ‘fluid’ when waterlogged, resulting in movement beneath the paving.
We apply the screed by dragging a straight edge length of timber over the partially-compacted laying course material and ‘scraping-off’ the top layer to create a smooth, profiled laying surface to accommodate the paving.

The Paving Layer
The paving blocks are laid to a specific pattern. We mix up the packs of blocks to ensure there is no banding or spotting of certain shades within the pavement. This is very important with multi-coloured and brindle coloured blocks. We then use a interlocked ‘Herringbone’ pattern to create a firm surface. Other patterns can be used for areas of low foot-traffic areas such as paths and patios.
Features can be built into the paving layer using different combinations and shades of blocks. This can look particularly attractive on large block paved areas and break up the overall look.
Cutting In
When all the blocks are have been laid we ‘cut-in’ all the areas not filled with whole blocks. This produces the perfect finish and enables us to carry the pattern across the whole area. This is often the most time consuming part as each part block has to be angled and cut precisely to produce a nice tight fit.
If you have drain covers we use a block paving tray that enables us to cover the drain without breaking up the overall effect. This tray can be easily removed to allow access to the drain.

Jointing
Jointing block pavingOnce the whole area is completely paved and cut-in we replace any cracked or chipped blocks, before using a plate vibrator to compact the blocks down to the final level and firmly bed them in. We go over the whole area thoroughly to ensue a perfect finish.
Sealing
We brush a bone-dry silica sand across the paving to fill in all the joints and create that perfect finish. We recommend that you brush another bag or two of silica sand (obtained from your local builder merchants) over the paving after 1 month, this is to allow for the original sand to bed.
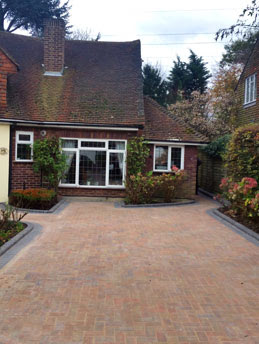
The Final Result
A stunning drive, expertly designed, planned and installed, leaving the customer 100% satisfied.
Please contact us to tell us about your new driveway, path or patio requirements.